Friday, December 10, 2010

Camera Tricks and Treats

Hi guys! Sorry for not posting yesterday... I was busy doing stuff. But anyway, as said in the last post, i will be posting something about technology. As the title suggests, camera tricks and treats! ^.^ 


Camera manufacturers are pilling tricks onto camera models and turning them into multi-talented treats for photo buffs. From High Definition video recording to photo-tweaking features that would have required a computer plus photo-editing software to execute, such tricks would turn even the dullest of photos and videos into exciting ones! Here are some tricks and treats you will want to know when shopping for your next camera! 


High-Definition video

HD video recording used to require large camcorders to shoot. Well, not anymore. Cameras that record HD videos start to reduce in size. For those thinking of getting a camera with photo and video functions, you might want to watch out for the ability to record audio in stereo and auto-focus when recording videos.


Extended Optical Zoom

Focal length ranges in cameras expanded significantly, allowing users to take in on a huge landscape and then zoom in to magnify on an object miles away. Optical zooms have increased from the old 3x to 5x! Compact superzooms start at 10x and the compacts with bigger bodies start at 24x. Wide angles of 28mm or wider and with faster apertures - f2.8 or more - that emit more light allow more flexible composition and better low-light shots.


More Sensitive or Bigger Sensors

The mass market models are still fixated at a high megapixel count to attract clueless costumers, performance compacts stick to the 10 to 12 megapixel band. These cameras use either a re-designed low-light performance, called the backside illumination or BSI sensor, or a physically bigger one. The latter are the prosumer model that allow total manual control and shooting in RAW files.

In-camera panorama

This trick does the work of a PC and an image-stitching program. Press the shutter button once and then pan the landscape with the camera slowly by following the arrow indicated on the LCD till the camera has collected enough shots to make a panoramic photograph. You might want to get one of these powerful cameras that not only help to stitch the images together, but also create a stunning 360-degree view of the place. Something that everybody wants.

HDR photos

High Dynamic Range [HDR] photos overcome the contrast limits of a digital camera by merging  into a single image the best portions of a few shots taken of the same subject at different exposures. HDR panoramic photographs used to require special or high-end image-editing software, but now, with the advances in technology, this can be easily done in-camera.

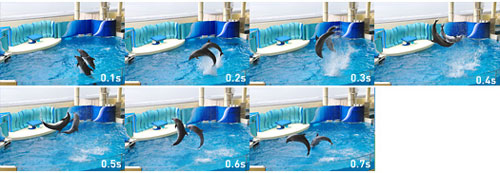
High-speed shooting

Top-end DSLR cameras peak at 10 frames per second [fps]. Some compact cameras can clock faster frame rates from 10 to 40 fps. Compact cameras are now able to clock frame rates of 1000 fps, but do keep in mind that image quality decreases with the increasing frame rate. Excellent lighting is also needed for such feats.

Tilt-shift lens simulation

This trick mimics the effect of using a tilt-shift lens on a DSLR camera. By controlling which parts of the photo are in focus, it can make a landscape look toy-like or a miniature. It is also able to make a person stand out with selective focus instead of just using a large aperture to create a narrow depth of field. 
Make sure to keep these buzzwords in mind when shopping for your next camera or else... ???
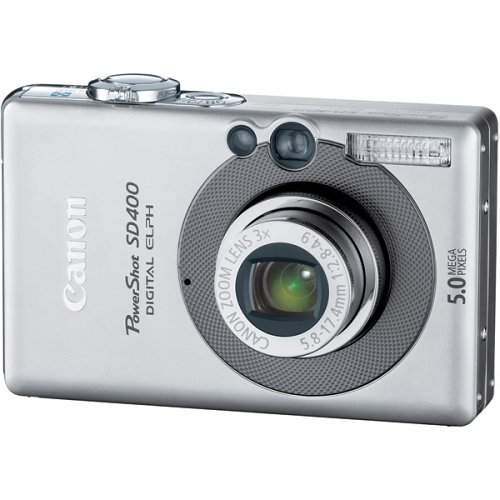
I'll leave it to you to think about it yourself. Yeah. And as usual, some pictures of cameras and some of the tricks above in action.
                                             Amazing isn't? Looks like a miniature. 
                                                                      Cool right?

                                                         iPhone app - PaparazziCam
                                        Did you know that this camera [below] existed?
Cool isn't it? I guess it kind of a spy camera, given that its small enough to go around your finger. Anyway, that's all for today folks! Please do visit us again and please also help to publicize our website. Here's our Facebook fan page and Twitter! Please follow us too! Thank you very much! See you again soon! ^.^ Bye!


Help to click my Pokemon too! Thanx! =D 

Tuesday, December 7, 2010

Some more recipes! =D

Imagine, sitting on a patch of green grass on a hillside, enjoying the buttery taste of a pastry whilst listening to mother nature's music... Wouldn't that be great if we could do that everyday? Okay, maybe not everyday... How about once a week? Such a lovely moment for a couple of pastries and maybe a slice of cake. As promised, here is a cake recipe. Another pastry recipe will be added after the cake recipe. 
                                   Applesauce Fruitcake
                                         Servings: 12

Ingredients

  • 1 1/2 cups white sugar
  • 1 cup shortening
  • 2 eggs
  • 3 1/4 cups all-purpose flour
  • 1 1/2 teaspoons baking soda
  • 2 teaspoons ground cinnamon
  • 1 teaspoon ground allspice
  • 1 teaspoon ground cloves
  • 1/2 teaspoon salt
  • 1 1/2 cups chopped walnuts
  • 1 1/2 cups raisins
  • 1 1/2 cups dates, pitted and chopped
  • 1/2 cup maraschino cherries, coarsely chopped
  • 2 cups applesauce
  • 6 maraschino cherries, halved
  • 6 pecan halves


Method

  1. Preheat oven to 325 degrees F (160 degrees C). Grease a 10 inch tube pan. Line bottom with parchment paper and grease again.
  2. In large bowl, cream sugar and shortening until light and fluffy. Add eggs and blend well.
  3. Lightly spoon flour into measuring cup; level off. Combine 1/2 cup of flour with nuts, raisins, dates and 1/2 cup cherries, stir until coated. Set aside.
  4. Add remaining 2 3/4 cups flour, baking soda, cinnamon, allspice, cloves and salt to egg mixture. Blend at low speed until moistened, then beat 2 minutes on medium speed.
  5. Fold fruit and nut mixture and applesauce into batter. Pour batter into a 10 inch tube pan. Arrange cherry halves and pecans on top.
  6. Bake at 325 degrees F (160 degrees C) for 1hour and 15 to 45 minutes, or until toothpick inserted in center comes clean. Cool upright in pan 5 minutes. Turn upright onto wire rack and remove pan and parchment paper. Cool completely.

Here comes a pastry recipe! Feast your eyes on the Almond Mince Pies !
                                              Servings: 12
Preparation time: 30mins - 1hr               
Cooking time: 10 - 30mins

Ingredients

  • 225g/9oz plain flour
  • 2 tsp ground cinnamon
  • 140g/5oz chilled butter, cut into cubes
  • 55g/2oz ground almonds
  • 25g caster sugar
  • 1 egg, yolk only
  • 55g/2oz golden marzipan
  • 170g/6oz vegetarian mincemeat
  • 2 tbsp sherry
  • Caster sugar, for sprinkling
  • Cream, custard, or brandy butter, to serve

    Method

    - Put the flour in a blender with the cinnamon. Add the butter and blitz to form fine breadcrumbs. Add the almonds, sugar, egg yolk and 2-3 tbsp of cold water and blitz to form a soft dough. Knead the dough briefly on a floured surface, then wrap in cling film and chill for 30 minutes.

    - Meanwhile, chop the marzipan into small pieces. Stir into the mincemeat, along with the sherry.

    - Preheat the oven to 190C/375F/Gas 5. Thinly roll out the pastry and cut out twelve 7.5cm/3in rounds. Place the rounds in a greased 12 hole tart tin. Divide the mincemeat between the pastry cases.

    - Cut out 12 stars and place one on top of each tart. Bake for 20 minutes until the pastry is golden and cooked through. Transfer to a wire rack and sprinkle with caster sugar. Serve with cream, custard or brandy butter.

    That's all for today! Some pictures i want to share with you below! ^.^
                                Isn't that such a lovely cake?
    I hope you like mentally indulging on Häagen-Dazs ice-cream and cakes! I love to eat Häagen-Dazs ice-cream, but its very expensive. A scoop of ice-cream can easily cost you 10-20 dollars... I've only tasted Häagen-Dazs ice-cream only once, but i have to tell you i LOVE it! The chocolate is... AmAzInG! ^.^ The fondue above cost about $30... 


    Anyway, hope you liked the pictures! Please comment and follow us! ^.^ Please visit our Twitter account and Facebook fanpage! (Facebook business page here) Help me to publicize our online store as well! Thanks for helping! See you again soon. Do except a post on technology and gadgets tomorrow or maybe the day after. Bye! ^.^


    Oh! Wait. Help to warm my eggs and pokemon as well! Thanx! =D

Cakes and pastry!

Hi guys! I have been quite busy these few days such that i have not much time left for blogging... Anyway, i today's post, do expect lots of pictures and an addition to the last pâtisserie post. I would also be blogging about cakes and the different cake baking methods used. So now, lets proceed on! ^.^


There are many ways to bake a cake and it is determined by the fat you're using and the end result you want to achieve. 


1. Creaming method -  This is a method for mixing sugar, butter and eggs together. (for cakes or even biscuits) The main steps in this method are beating the butter (softened a little if necessary) with the sugar until a soft, pale, creamy, thick and fluffy mixture is obtained. The eggs also have to be beaten in one by one. 
2. Rubbing-in method - This method a similar method to making shortcrust pastry. A cake made by this method starts off with rubbing the fat into the flour till resembling fine breadcrumbs. Water is then added to the mixture until it is of dropping consistency. 
3. All-in-one method - As the name suggests, these cakes are mixed all at one go. All ingredients including flour, butter, sugar, vanilla essence, etc, goes in together. The butter has to be in small cubs or it would be difficult to mix. The mixing is done in a few minutes and the mixture is done and ready for the oven. 
That's all of the cake baking methods I know of... If you know any more, please feel free to comment on this post with another cake baking method. Well, here are some tips on baking.


- When baking cookies, muffins, and cakes, make sure the butter and eggs are at room temperature. Recipes usually specify the butter to be softened (room temp) but rarely the eggs. Make sure the eggs are at room temperature to achieve better results. Cold eggs hitting warm butter causes the butter to congeal no matter how fast you mix it. It produces a greasy product -- not exactly what you want.


- Separate cold eggs and whip egg whites only at room temperature.


- Use unsalted butter as there might just be too much salt in the butter.


- Preheat the oven. Be patient. Allow it heat up. And, don't open the door all the time to check on your yummy baked goods, either. You're letting heat out! Patience.


--> Why must you preheat the oven?
If you need to cook something in the oven for a specific amount of time at a specific temperature, then it must be cooked at that temperature the WHOLE time. If it takes 10 minutes to preheat it to 300 degrees, and you put the food in WITHOUT preheating, it would not be cooked enough. And if you put the food in WHILE preheating, you end up overcooking it. 


- Remove muffins and cookies from the pans within the first 5 minutes after removing from oven. This prevents sogginess. Using racks to place the cookies or muffins (or cakes) will allow for even cooling.


- Sifting or to not sift the flour? For cookies or muffins, whisk the dry ingredients together. However, when it comes to delicate cakes, sift the flour. It will aerate the flour and help it to mix into the batter better. Sifting removes lumps of flour that may cause the cake to be 'uneven'.


- Egg size matters a lot. The bigger the eggs, the softer and more tender the cakes will be. So try to use larger eggs instead of smaller ones.
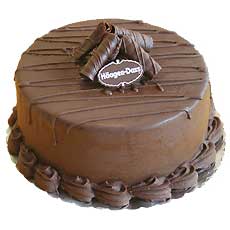
                                                                   Chocolate Cake
Like this picture of a chocolate cake? Here's some more cakes for you to 'indulge' on! ^.^ 
Oh! That reminds me... Remember earlier on this post, I said i would make an addition to the last pâtisserie post? The addition that i meant was to add a pastry recipe that i found to be quite intriguing and interesting. Here's the recipe: 
                                                 Christmas mini-muffins
- Preparation time: Less than 30mins                                
- Cooking time: 10-30mins
- Make 24 mini muffins in cute individual cases – perfect for Christmas canapés or as a daily advent calendar-style treat. 


Ingredients


  • 200g/7oz self-raising flour, sifted
  • 100g/3½oz golden caster sugar
  • 100ml/3½fl oz sunflower oil
  • 75ml/2½fl oz milk
  • 1 large free-range egg
  • 50g/1¾oz qood quality dark chocolate, chopped
  • 1 heaped tbsp high quality mincemeat
  • 50g/1 ¾oz good quality white chocolate, chopped
  • 50g/1¾oz dried (or fresh) cranberries

Method

  1. Preheat the oven to 190C/375F/Gas 5 and put 24 mini-muffin cases inside a mini-muffin tin.
  2. Mix the flour and sugar in a bowl, then make a hole in the center. Whisk together the oil, milk and egg and slowly pour into the bowl, stirring gently. Divide this mixture between two bowls. In one bowl add the dark chocolate and mincemeat. Add the white chocolate and cranberries to the other bowl. Stir very gently.
  3. Divide the two mixtures among the 24 muffin cases and bake for 20 minutes or until golden brown and risen.
  4. Remove the muffins to a wire rack and eat warm.
Would you like to see another recipe? I've decided to add another one... Here it is! 
                                Gingerbread Cake with Orange icing
Preparation time: Less than 30mins
Cooking time: 1-2hrs
This rich, treacly gingerbread is addictively good. Try making it as an alternative to a traditional Christmas cake. Serves 10-12.

Ingredients

For the cake

  • 225g/8oz butter, softened
  • 225g/8oz light muscovado sugar
  • 225g/8oz golden syrup
  • 225g/8oz black treacle
  • 225g/8oz self-raising flour, sifted
  • 225g/8oz wholemeal self-raising flour, sifted
  • 4 tsp ground ginger
  • 2 tbsp stem ginger (from a jar), chopped
  • 2 free-range eggs, beaten
  • 300ml/10½fl oz milk
For the orange icing
  • 150g/5oz icing sugar
  • 1 orange, juice and zest
    Preparation method
    1. Line a 23cm/9in square cake tin at least 4cm/1½in deep with baking parchment.
    2. Preheat the oven to 160C/325F/Gas 3.
    3. Place the butter, sugar, golden syrup and black treacle into a pan and heat gently until the mixture has melted evenly. Set aside to cool slightly.
    4. Sift the flours, ground ginger and stem ginger into a large mixing bowl and mix gently. Pour the cooled butter mixture into the flour. Add the eggs and milk and beat with a wooden spoon until well combined.
    5. Pour the cake batter into the tin and level the surface with a palette knife or the back of a spoon. Bake for 50 minutes, or until the cake has risen and is golden-brown and a skewer inserted into the middle comes out clean. Set aside to cool slightly in the tin, then transfer the cake to a wire rack and set aside to cool completely.
    6. Meanwhile, for the orange icing, sift the icing sugar into a bowl. Add about two tablespoons of the orange juice and mix to a smooth paste. Add more orange juice, as necessary, until you get a smooth icing of the consistency you desire.
    7. Pour the icing over the cooled cake and spread lightly, allowing it to ooze over the edges. Sprinkle over chopped orange zest and set the cake aside until the icing has set.
      And there you have it! Gingerbread cake! ^.^ Anyway, enjoy some more pics of these tasty pastries and cakes! =D Enjoy! 
                                          Not exactly edible cakes, but after all, they ARE cakes! ^.^ 
      Wow! Aren't those cakes and pastries simply delicious just by looking at them? Well, i think that's quite enough for today. Tomorrow, i'll probably post another recipe for either a cake or a pastry. So, check back tomorrow for a few more recipes! =D 


      Please also visit our site! (http://www.shortandsuite.webs.com) Recommend to your friends and family our online store and please also help to publicize it! Thank you! Follow us on Twitter and like us on Facebook! (Facebook fan page here) Thank you!! See you again tomorrow! =D Bye! 


      Help to click my eggs and Pokemon too! Thank you so much! ^.^